
This script is a tool written in Python for Maya that takes multiples curves and procedurally generates a single geometry object. The user can control the radius of the tubes along the curve as well as the resolution and smoothness of the geometry. The script works best with models that have tube-like structures, such as the trabeculae of bone or neurons.
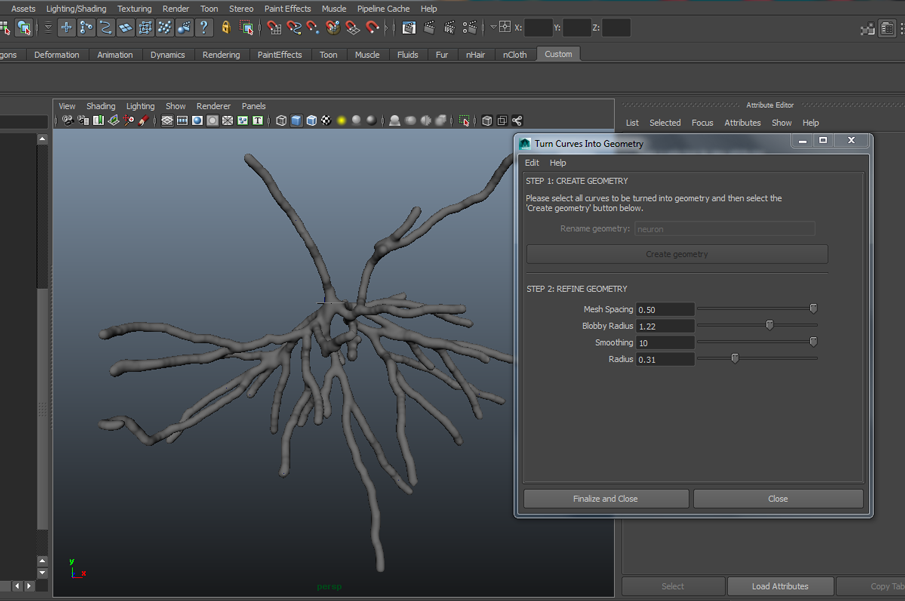
The image below is of a human pyramidal cell found in the neocortex. The curves were imported into Maya using NeuronBuilder v0.91 via NeuroMorpho.org.
To set up:
1. Download the script here.
2. Open the Script Editor (Window > General Editors > Script Editor)
3. Within the script editor, click on the Python tab on the bottom half of the window. Drag the curveToGeom.py script into the text box below the Python tab.
4. Select all and MMB drag to the Custom shelf.
5. It is now ready to run!
To use:
(Note: These instructions are available in the GUI in the Help menu.)
1. It is a good idea to delete history and freeze transformations on your curves before using the GUI.
2. You must first select all curves that will be turned into geometry. If you wish to specify a name for the surface, type that name in the ‘Replace geometry:’ prompt. Then click the ‘Create geometry’ button.
3. Next, refine the mesh by settings the controls listed under Step 2. The mesh is a polygon object that has been converted from an nParticle object.
- Mesh Spacing: controls how fine the mesh is. A smaller value results in a finer mesh with more faces.
- Blobby Radius: controls how large the output blobby particles are, and as a result, the diameter of the mesh along its entire length.
- Smoothing: controls how smooth the mesh is.
- Radius: controls the initial radius of the nParticles. This is different from the blobby radius, which additionally controls the radius after the particles have been converted to polygons.
4. To delete all geometry and start over again, go to Edit > Delete Geometry and Reset Settings.
5. Choose ‘Finalize and Close’ if you are happy with the geometry and want to remove history on the object. If you still require control over the mesh, choose ‘Close’ instead. For further access to the controls, go into the attribute editor for the nParticleShape object, under the Output Mesh tab.